September 24, 2011

Green Tomato / Pachathakkali Aviyal

Green tomatoes are rarely seen in markets. At home, we had access to them  when we had tomato plants growing in our garden. Those plants would have come up on their own from the rotten tomatoes discarded on the foot of the coconut tree or some other plants where vegetable wastes are usually dumped. When the plant comes up, it will be uprooted and planted in  a pot or some better place in the back yard.  Amma used to add them to the dal or make chutney/thogayl with it. I do try to pick some green ones from the vendors. But hardly I get the real green ones. Last month, while we were returning from our trip to BhimaShankar, we happened to see a way side market selling fresh produce. We stopped to buy some veggies. I was excited to find a lady with a basket full of green tomatoes. I don't remember if I have seen such green ones sold before. And while discussing various recipes using them, my friend told me about this aviyal. It sounded very simple and tried it. It was very tasty and I prepared it twice in a week's time.


Preparation time - 5 minutes
Cooking time - 10 minutes
Serves - 3

You need

  • Green tomatoes - 3 nos
  • Turmeric - a pinch
  • Red chilli powder - 1/4tspn
  • Salt to taste
  • Coconut oil -1 tspn
  • Curry leaves - 1 sprig


To grind

  • Fresh grated coconut - 1/2 cup
  • Green chilly - 1 no
  • Cumin -1/4 tspn


Method
Slice the tomatoes. Grind the coconut with green chilly and cumin to a smooth paste.  Take the sliced tomatoes, turmeric, red chilli powder, salt and the ground coconut paste in cooking bowl. Add water to adjust the consistency. Cook the mix on slow fire for 10 minutes or till the tomatoes are cooked. Take care that the gravy doesn't boil and bubble. This will make the gravy watery.  Remove from fire. Add coconut oil and curry leaves. Close it and let the flavors mingle. Enjoy with hot rice and side of any veggie stir fir or papadam. no souring agent like tamarind/yogurt is added since the tang from the tomatoes is good enough.


Note: if you want to cook it as side dish then, saute the tomatoes in little oil and add the ground paste and cook. Also if you wish you can 2/3 shallots or madras onions while grinding. I did not add since I wanted the taste of tomatoes to be more prominent


September 17, 2011

Kaayatholi /Banana Peel Thoran


For Onam, when I planned to make banana chips, it was two recipes in one shot. The left over banana peel is made into a thoran. Frankly I was more interested in the peel than the chips. It has been a long time since I had the thoran with the peel. Back in Kerala, we can get banana peels from any of the shops frying the chips.  The peel of the nenthran variety is very thick and tastes good. I usually pair it with black eyed beans/vellapayar. This time, I didn't have it in my pantry and used whole moong. It also tasted delicious. It is a simple preparation that goes well as a side for rice with sambhar/morkootan.


You need
  • Banana peel of 4 bananas
  • Whole moong - 1/4 cup
  • Green chilly -1 
  • Coconut - 2 tblspn
  • Turmeric a pinch
  • Salt to taste
To temper
  • Oil - 1 tspn
  • Mustard seeds - 1/2 tspn
  • Dried red chilli - 1 nos
  • Curry leaves - 1 sprig


Method
Chop the peel into bite sized pieces. Soak it for few minutes, in water with a tablespoon of buttermilk added to it. This will help to remove the stickiness and avoid discoloration. Drain and add washed whole moong, turmeric and salt. Add enough water just to cover it. I usually pressure cook for 2 whistles. The peel doesn't turn mushy.  Pulse the coconut and green chilly. Don't add water. It should be coarsely ground.

Heat oil in a kadai. When hot, add the mustard seeds. When the seeds splutter, add the red chilli, broken into two and curry leaves. Add the cooked peel and moong. Give a gentle stir. Add the ground coconut-green chilly. Cover and cook for a minute.  Remove from fire.


September 12, 2011

Kadalaparuppu Pradhaman

Payasam is an integral part of any sadhya/feast.  When it comes to Onasadhya, the payasam has to be something special.  Pradhaaman is considered the king of payasams and is a Kerala speciality. In the land of coconuts, its no wonder that the earlier generations made use of bountiful of coconuts. Milk, in those days, was not available in packets and no refrigerators to increase the shelf life. But now things have changed. Both milk and coconut milk are available in plenty, in ready to use tetra-packs. So making payasam is not that difficult. When it comes to coconut milk, the freshly squeezed milk is any day better than the store bought ones.  With the mixer grinders, extracting milk is not that difficult job either. The basic ingredients for a pradhaman is a main ingredient - rice/chakka varatti/dal/wheat, jaggery, coconut milk - in various thickness. Having said that, the main ingredient determines the taste of the pradhaman and I assure you, each is unique in its taste and there is no way to compare them. This Onam, it was kadalaprauppu/chana dal pradhaman.

I missed the festive atmosphere in Kerala. Also the fresh flowers from garden for the pookalam. Here is the small pookalam made on the Onam day.


And this is the Onasadhya we had - Menu included Parikkai/Bitter gourd thayir pachadi, kaalan, aviyal, elissery, thoran, chips, sharkkaravaratti upperi, pappadam, payasam, sambhar.


You need

  • Chana dal/Bengal gram dal/Kadalaparuppu - 1/2 cup
  • Powdered jaggery - 1 cup, heaped
  • Coconut - 2 medium sized
  • Cardamom powder - 1/2 tspn
  • Coconut bits - 1 tblspn
  • Ghee - 2 tspn


Method


Wash and pressure cook the dal till its well cooked. After the cooker is opened, lightly mash the cooked dal. See to that it doesn't end up in a paste form. We need few bits of the dal to give some texture to the pradhaman.

Grate the coconut and grind it in the mixer using very little water. Take the ground coconut on to a cheese cloth. Squeeze the ground coconut to extract the milk. This is the first, thick milk. Repeat this for two more times to extract the second and third milk. We need 3/4 cup of first milk, 1 1/2 cups of second milk and 2 cups of third milk.

Take the jaggery with half cup of water in a bottom thick vesssel or kadai. When the jaggery melts fully, filter it to remove any impurities. To the filtered jaggery syrup, add the mashed dal and thin, lastly squeezed out coconut milk. Cook this mixture, till it thickens. Then add the second coconut milk extract and continue to cook till it thickens again. By this time, the dal and jaggery mix would have absorbed the coconut milk well. Bring the mix to a boil. Add the first extract of  coconut milk and switch off the heat. Keep stirring for 5 minutes, till its blended well. Stir in the cardamom powder.

Heat ghee in a seasoning ladle. Add the coconut bits. Saute till it starts browning. Add it to the prepared pradhaman. Serve it warm.


Sending this pradhaman to Kerala Kitchen, hosted by Divya.


September 8, 2011

Kaaya Varathathu/Banana Chips

Banana chips is an integral part of any sadhya/feast. Instead of the usual round chips, when it comes for festive spreads, the quartered chips are mostly preferred. This kind is not thin, will slightly thick too. All these years, being in Kerala, I have not bothered to make this at home. I get fresh chips at shops which are just a stone's throw away. Now that I am away from my native, I thought I should make some at home. Its not that I don't get it here. Husband has already got the quartered chips and the Sharakkaravaratti for the Onam Sadhya.  Frying the chips is not a big task. The variety of banana is important to get the right taste and crispness. Then Nendran variety, which is very popular in Kerala, is the preferred one. Unlike the other variety of bananas, the matured and not ripe ones has a slight pinkish color.


You need

  • Raw banana - 4 nos
  • Salt - 2 tspn
  • Turmeric - a pinch
  • Water - 1/2 cup
  • Oil to deep fry.


Method
Remove the skin. The chips makers at Kerala removes the skin in such a way that its not scrapped but the whole peel comes out. They score along the thick line on the banana. With the pointed part of the knife, slightly lift the skin. That way, the entire skin will be removed and will leave no marks on the banana too. That calls for some practice. I tried that way and was partially successful. Don't discard the removed skin. Preserve it and make a tasty side dish. I made that the next day. Shall post that recipe later. Now on to the business making chips.

Take half cup of water in a bowl. Add turmeric and salt. Stir well so that the salt is dissolved. Heat oil in a kadai. Take the prepared banana and slice it directly to the hot oil. If you are not comfortable doing it directly over the hot oil, slice it on to a plate and drop them into the oil. After a minute of frying, sprinkle some salt water on to the frying chips. There will be a rise in the sizzling sound. It will not last for few seconds. Oil doesn't spill also. No need to get scared for this. This will help to give some nice color to the chips and a salty taste too. 

When the chips turn golden yellow and is crisp, drain on to a strainer. Repeat with the remaining bananas. Store it in air tight container. Enjoy fresh, home made chips.


Wishing all my readers a very happy ONAM.

September 7, 2011

Jowar BisiBeleBhath

With my attempts to include jowar in the diet, I tried making Bisibelebath (BBB) using the jowar grains. BBB is one dish which I have tried with wheat and poha/avil as replacements for rice and was quite successful. With the confidence from the earlier trials, I decided for BBB. And I remembered Champa's post featuring an authentic family recipe for BBB. Anything authentic catches my attention immediately. I took this opportunity to try her recipe. Unlike Champa, I took an easy route with cooking jowar and dal. Else I followed her recipe. I reduced the quantities since it was for only 2 people for one meal.  I loved the flavor with the various spices that went into the masala.  


You need

  • Jowar grains - 3/4 cup
  • Tuvar Dal  - 1/2 cup 
  • Tamarind - gooseberry sized
  • Salt - to taste
  • Turmeric - 1/4 tspn
  • Oil - 1 tsp


For the masala:

  • Chana dal/Kadalaparuppu - 2 tbspn
  • Urad dal - 1 tbspn
  • Coriander seeds - 2 tbspn
  • Red chillies - 5 nos
  • Methi seeds - 1/4 tspn
  • Jeera/cumin - 1/2 tsp
  • Pepper corns - 1 tspn
  • Cardamom - 1 whole
  • Cinnamon - 2 1" sticks 
  • cloves - 4 nos
  • Nutmeg powder - a big pinch
  • Poppy seeds - 1 tsp
  • Kopra/Dry coconut - 1/2 cup
  • Oil - 1 tsp

For seasoning 

  • Oil - 1/4 cup
  • Mustard seeds - 2 tspn
  • Red chillies - 2 broken
  • Curry leaves - few sprigs


Method:
Pressure cook jowar and tuvar dal with a pinch of turmeric separately. Soak the tamarind in a cup of warm water. Take a kadai with the ingredients for  masala except nutmeg powder and poppy seeds. Roast on a medium flame till the dal turns golden brown and you can smell  the aroma of roasted spices. Just before  
removing, add nutmeg powder and poppy seeds. Mix well and leave it to cool.

Powder the roasted masala mix to a fine powder. Add the kopra/dry coconut to the powdered masala and pulse to blend finely.  Squeeze the soaked tamarind to extract the juice fully. Add some of the extracted tamarind water to the ground masala to make a thick paste. Reserve the remaining tamarind water.

Take the cooked dal in a pot, add salt, the ground masala paste. Mix well and add the remaining tamarind extract. Adjust the consistency by adding more water. When the the dal starts boiling, add the cooked jowar. Keep stirring so that it blends well. 

In a seasoning ladle, heat 1/4 cup oil. When hot add mustard seeds. When the seeds splutter, add red chillies, curry leaves.  Add the seasoning to the cooking mixture. Stir. Check the consistency and seasonings. If required, add some hot water to make it thin. On cooling, it gets thick. 


I find the jowar BBB very tasty. Though the grains were slightly chewy, it had absorbed the flavors well. May be next time, I shall try to pulse the grains coarsely like the broken wheat. 


September 3, 2011

Team Continuum | Pixels of Promise - Assisting Patients Fighting Cancer


Team Continuum was founded as a not for profit charitable organization in 2003, Team Continuum provides immediate, vital, non-medical assistance to cancer patients and their families. What we do is quite simple, but has a direct, profound effect on their lives.

Team Continuum is honored to be an official Charity Partner of the New York Road Runners. With several hundred entries we are among the largest independent teams in the world-class 2010 ING NYC Marathon. Athletes who did not get in via the lottery or did not register at all can secure their entry by joining the team and registering online at www.teamcontinuum.net. Benefits include coaching, race day gear, and a private pre-race pasta party.

For more information visit our website www.teamcontinuum.net or call 917-595-4168.


hOW iT all began

In 2003 a man with stage 3 Myeloma asked his doctor if he would be able to run in the NYC Marathon. Considering be was about to go through a stem cell transplant, surgery on his left arm and a few rounds of chemo, his doctor thought he was crazy.
After figuring he was in fact serious, his doctor was so inspired he decided to run with him, and raise money doing so. That man was Paul Nicholls, the founder of Team Continuum, and he finished his marathon so others could do the same.
Team Continuum 2003
Since 2003, he and his volunteers have raised over $3.5 million to help families battling cancer and to provide funding to improve cancer patient care programs, at some of the largest cancer treatment facilities in the country.
Team Continuum is a non-profit organization dedicated to taking immediate care of anyone involved in fighting cancer. We give cancer patients access to the everyday cure. We fill in the physical and emotional gaps of support so cancer patients can have the strength to focus on their treatment.


Please visit the PixelsOfPromise website and click on the pixels to see more about the patient's  disease and in what ways the team has supported the patient. If you wish to help a patient, click on the donate tab.


Disclaimer
This sponsorship is brought to you by Team Continuum who we have partnered with for this promotion.


September 2, 2011

Vinayaka Chathurthi Special - Poornam and Uzhunthu Kozhukkattai

Hope all who celebrated Vinayaka Chathurthi have feasted on an array of sweet and savory dishes, yesterday.  Both my mother and mother-in-law makes only the sweet and salt varieties of kozhukkattais as prasadam for Chathurthi.  I  too follow the same tradition. Though I make it every year, somehow the recipes have not made it to the blog. This time, I was determined to take pictures and post it here.  Most of the time, too much of work drains me off and I will be in no mood to click pictures. This time, it happened that things started on a slow note right from the morning. So, I thought to myself that I better not hurry up and let the day takes it course. I felt 'Slow and Steady Wins the Race' will hold good for the situation. Those thoughts put me at ease and I clicked some pictures too. 


I prepared the outer covering for both the kozhakkattais together. I took 3 cups of rice flour. I will give the recipe as I made.

Sweet Kozhukkattai/Modak
Yields - 30-35 nos
For the outer covering

  • Rice flour - 3 cups
  • Water - 6 cups
  • Milk - 1 tblspn
  • Coconut oil/Ghee - 2 tspn (I added coconut oil)
  • Salt - 1/2 tspn


For sweet filling

  • Grated jaggery - 1 cup
  • Fresh grated coconut - 2 cups
  • Ghee - 2 tspn
  • Cardamom/Elaichi powder - 1/4 tspn


Method
Take a kadai big enough to hold 6 cups of water. Add water, milk and  oil/ghee. When water starts boiling, slowly add the measured rice flour. Keep stirring so that no lumps are formed. When the dough comes together, remove from the heat. This will take only 5 minutes. Close the dough with a plate. 

While the dough for the outer cover cools, we can prepare the sweet filling. Take the jaggery with 1/4 cup of water in a kadai. Let the jaggery melt and the syrup starts boiling. The syrup need not be very thick. It should be sticky and close to the one string consistency. Add the grated coconut, elaichi powder and ghee. Stir well and continue to cook till the liquid dries up and coconut mix is moist. Switch off the heat. 


Leave it to cool. Divide the filling into small balls. 


Take a ball of the dough. Knead it well. Use ghee/oil to apply on your hands. Take a gooseberry sized dough. Flatten it using your fingers. Make it thin. Place a coconut-jaggery ball on the center. Gather the edges and seal it and form a pointed top. Repeat it till you use up all the fillings.


Keep the prepared modaks in the steamer and steam cook for 10-12 minutes or till the modaks have a shiny appearance.


Let it cool on the steamer for few minutes before you take it out on a plate. When you try to remove while hot, it may break.  If you are placing the modaks on a banana leaf then it will be easy since you can pull out the leaf along with the whole lot.


Uzhunthu Kozhakkattai

Yields- 25-30 nos


For the filling

  • Urad dal - 3/4 cup
  • Grated coconut - 1/4 cup
  • Green chillies - 4 nos
  • Salt to taste
  • Hing powder - 1/4 tspn


To temper

  • Oil - 1 tblspn
  • Mustard seeds - 1 tspn
  • Red chillies - 2 nos
  • Urad dal - 1 tspn
  • Curry leaves - 1 stalk

Method
Soak the urad dal for 45 minutes. Drain and leave it on the colander for few minutes so that all the water is drained out fully. Take the green chillies and salt in the mixer grinder. Pulse it. Then add the drained urad dal and grind it coarsely. 

Take the ground mixture in a bowl and steam cook it for 10 minutes. Cool it. Crumble the steamed mixture. Heat oil in  a kadai. When hot, add mustard seeds and let it splutter. Add red chillies, urad dal and curry leaves. When the dal starts to brown, add the steamed and crumbled urad dal, coconut and hing. Mix well and cook for 2-3 minutes and remove from the heat.


The shape of uzhunthu kozhakkattai is different. Its shaped oblong and the keep a tablespoon of  filling from end to end. Horizontally, bring the edges and stick it. You can press down the edges to seal it firm. Steam cook for 10-15 minutes. 


If you have some leftover urad dal filling, mix it with cooked rice and Uzhunthu sadam is ready.


August 29, 2011

Jowar Laddu

Here is another quick and easy recipe using jowar grains. I remembered the laddu posted by Srivalli and checked it and found it suits my BM theme of cooking with five or less ingredients. Noted the recipe and went to the kitchen straight away and the laddus were ready in 15 minutes.  It makes a very healthy snack for kids and adults alike. There is very little ghee used in the recipe and is sweetened with jaggery.  This fits the bill as a nutritious sweet for your after meal dessert.


Time Taken : 15 minutes
Yields : 11 nos

You need

  • Jowar grains - 1/2 cup
  • Grated jaggery - 1/2 cup
  • Cardamom - a pinch
  • Ghee - 1 tablespoon
  • Cashew - 5 nos, coarsely ground

Method
To prepare this laddu, jowar pops is ground and mixed with jaggery. Ghee is the binding agent.  First the pops are to be made. Heat a pan. When it is hot, add the jowar grains. Keep stirring it. After 2-3 minutes, the grains will start pop. For me, not even half of the grains popped and I stopped roasting further in the fear of  burning the grains.  

Pulse the jowar pops in the mixer grinder. Don't grind it to a fine powder. Add the grated jaggery to it. Pulse it further so that it makes a homogeneous mix. Take the mix to a bowl. Add cashews, cardamom powder and warm ghee to the mix. Mix well.  The mix may look dry but you will be able to make balls out of it. Make lemon sized balls. Press it tight so that it stays together. It is very tasty that its difficult to stop with one.


Check out what my fellow blogging marathoners have cooked for the last day of the marathon.

August 28, 2011

Jowar Idli using jowar grains

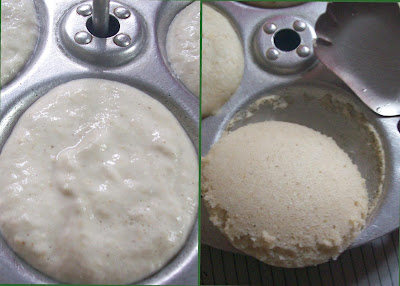
Food blogging has introduced me to many new grains/flours which  are not part of  my native Palakkad Iyer cuisine. During my grocery shopping, I tend to pick up new grain/flour to try in my kitchen. Most of the time, I will not have recipe in my mind. I had a big packet of jowar grains which I had picked during one of the shopping trips. I relied on Google to throw some recipe links on jowar grains. Most of the recipes used jowar flour. I decided to try idli starting with my usual idli recipe as the base recipe. I was very apprehensive of the outcome. Jowar is an new grain to me and its gluten free. I thought if the idli attempt do not meet success, there is always dosa to look forward.  After 10 minutes of steaming, I was surprised seeing very soft, off white idlis. 


You need

Jowar grains - 1 cup
Idli rice/parboiled rice - 1 cup
Urad dal - 1/2 cup
Methi seeds - 1/2 tspn

Method
Wash jowar, rice and urad dal separately. Soak jowar, rice and methi seeds together. Soak urad dal separately. I soaked it overnight. Jowar requires more soaking time than rice. Soak two hours more than what  you do for the regular rice for idli. 

Grind dal first till fluffy. Remove and grind jowar, rice and methi till it is ground fine. Mix the grain and dal batter with salt. Leave it to ferment for 5-7 hours, based on the weather in your place. 


Take the idli plates. Smear the depression with sesame oil. Spoon the batter and steam cook in a pressure cooker or idli steamer for 10 minutes. 


Remove the cooked idlis and serve with podi/sambhar or chutney.


I love to eat idlis dunked in a bowl of sambhar.


Check out what my blogging marathon friends have cooked for the day.


August 27, 2011

Rajgira Aloo Tikki

Rajgira flour is generally preferred as a fasting food since it is a non-cereal flour. The flour is prepared from the amaranth seeds. Mostly this flour is made as parathas. Being gluten free, it is suitable for gluten intolerant people.  I tried making tikkis with this flour. Used some mashed potatoes for binding. Very easy to make if you have cooked potatoes in hand.


Yield - 9 nos
Time Taken - 15 minutes

You need
  • Rajgira flour - 1 cup
  • Cooked and mashed potatoes - 1 cup ( I used 2 big potatoes)
  • Ginger,green chilly paste - 1 tspn
  • Seasoning ingredients - Salt, lemon juice, hing and chopped coriander
  • Oil to shallow fry

Method

Take all the ingredients except oil in a bowl. Mix well. No need to add water. The moisture from potatoes will help to bind the mixture.  Pinch off lime sized dough and shape into tikkis.  If you want some crunch, you can roll the tikkis in sesame seeds. This step is optional.

Heat a tawa. Place the tikkis. Drizzle oil on the tikkis. When the bottom gets cooked, flip and cook the other side. Enjoy hot with some ketchup or chutney.


I am sending this tikkis to the Fasting Food event by MomChef at Sizzling Tastebuds.

Check out what my blogging marathon buddies have cooked for the day