October 25, 2009

Parikkai (Bittergourd) Pitla


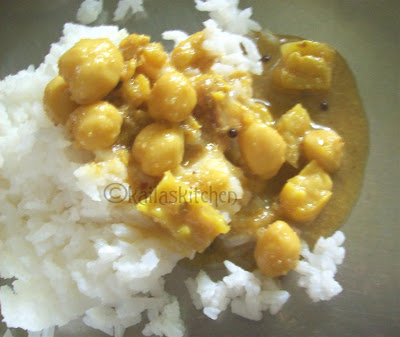
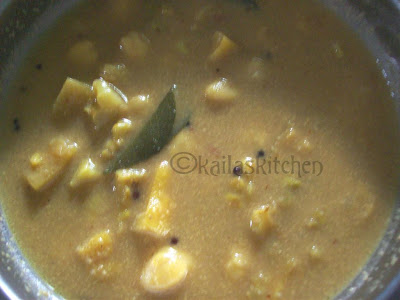
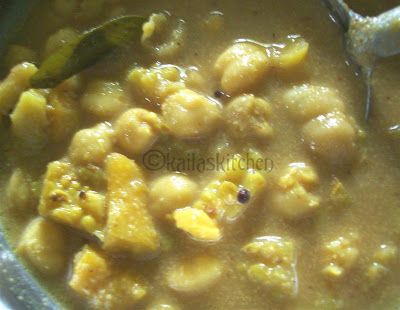
Past one week, we have had fare amount of sweets and savories in the name of Diwali and proportionately the calories have increased. The routine cooking had taken a backseat in the name of Diwali preparations. Sambhar is one of the staple of palakkad iyers cooking. And slight changes in the spices roasted and vegetables used will result in another dish. One such is Parikkai Pitla. Piltai is not much favored because of the bitter gourd in it, especially kids. I know many homes that make it only for the annual ritual for the departed soul is performed (Shraddam/Devasom). The preparation is almost similar to Sambhar.My MIL adds kabuli chana in place of tuvar dal in the recipe. I have seen when chana is added, kids takes an instant liking to the dish though will not touch the bitter gourd pieces in it. I usually cook with a light green variety of the BG which we get in my place. This is less bitter than the dark green variety. Infact, you can't taste the bitterness in the dish at all. When made as a stir fry with the addition of onions and tomato, you can easily pass it on as any other vegetable with the absence of the distinct bitter taste.


Bitter gourd - 1 medium sized

Tamarind - lemon sized

Kabuli Chana / Tuvar dal - 1/2 cup

Turmeric

Salt


To roast and grind


Urad dal - 1 tspn
Chana dal- 1tspn
Red chilli- 3 nos
Pepper corn - 4 nos
Hing - few shakes

Grated coconut - 1/2 cup


Seasoning

Oil - 1 tblspn

Mustard seeds - 1 tspn

Curry leaves - few

Grated coconut - 1 tblspn


Pressure cook kabuli chana /tuvar dal till it is soft. If using kabuli chana, it has to be soaked for 5 hours. I soak them overnight.


Wash the bitter gourd. Slit it open and discard the seeds. Chop into bite sized pieces. Extract the tamarind juice. Take tamarind extract, salt and turmeric. in a cooking bowl. Add 1/2 cup of water. When the tamarind extract starts to boil, add the chopped bitter gourd pieces. When the vegetable is cooked tender, add the mashed dal/chana. Reserve the cooked dal water.


Roast the spices except coconut in a little oil, till they are light brown. Grind the spices along with grated coconut to a smooth paste. Add water while grinding. Dilute the ground paste with the reserved water and stir into the cooking pot. Adjust the salt and consistency of the gravy by adding water. Bring to a boil and let it simmer for few minutes.

Season with mustard seeds, curry leaves and a tablespoon of coconut. The coconut should be roasted till brown.


When preparing for Shradham, moong dal is used and red chilly is fully replaced with pepper corns.


October 24, 2009

SnapIt - A plugin product review

SnapIt is a customized version of the standard print screen function. It’s a small plug in that can be downloaded in less than a minute even on a slow connection.  SnapIt makes the screen capture job lot easier and organized too. Once the program is started, a camera icon sits pretty on the status bar. To capture screen shots, you can continue using the print scr key. Once pressed, the mouse pointer changes to a plus sign and you can mark the area on the screen to be copied. Click on the icon to save the marked image to the desired location.


The image capturing be configured to different key options, other than the Prnt Scr key,  given by the program. Also the saving can be automated by defining the storage location, image formats (jpeg,png,gif,tiff & bmp) and starting name for the files and if it is to be incremental or random. Once these parameters are set, then capturing screen shots is super easy. All you do is just press the assigned key and go about with your work. The screen shots will be automatically saved in the designated folder.  This saves the time of opening software to paste the selected image, save and later crop to get the desired results. This plugin will be particularly useful for those creating tutorials or presentations.


(The above two images are captured with SnapIt)


A fully functional, trial version is available for 14 days. Thanks Katherine Poll for giving me the opportunity.


October 20, 2009

Vanilla Maida Cake, Ukkarai & Kaja ~ Diwali Sweets

Vanilla Maida Cake


This is Lalitha Maam's masterpiece recipe. Aunt makes it with different flavors and changes the color accordingly. I have always made with vanilla essence and used green color. This time my husband suggested to change the color. When I checked for yellow color, very little was left. I add a pinch of green to that yellow color and got a greenish yellow color. This is very easy to make provided you get the sugar syrup consistency correct, which is important for all Indian sweets.


Time : 20 minutes
Yields - 50 pieces

Maida/All purpose flour - 2 cups

Sugar - 4 cups

Ghee - 1 1/2 cup

Vanilla essence - 1 tspn

Food color - a pinch

Water - 1 cup


Heat ghee in a kadai. When it is hot, stir in the maida and switch off the stove. The maida gets cooked in the warm ghee. In another kadai, prepare the sugar syrup with 4 cups of sugar and 1 cup of water. When the syrup starts bubbling, add a tablespoon of milk. Let it continue to simmer. The scum will float on top and gently remove with a spoon. The sugar syrup should be of two string consistency, which is very important for this recipe. To check the consistency, wet your fingers and then take a drop of the syrup on your index finger. If stretched between your index and thumb fingers, you should be able to see two threads. If the syrup cooks beyond two thread is al so fine but not less, since much cooking is not done post that stage. Add vanilla essence and food color to the syrup. Stir in the maida+ghee mixture. And cook for two minutes till it comes together as one whole lump. Once maida is added to the syrup, you should act quickly. Once the sugar syrup has reached consistency, swtich off the stove. Mix in the mixture and give vigourus stir so that it blends in. Then heat the stove again.


Grease a plate with sufficient ghee and also a flat based cup (I use dhabhara) to level the mix once it is transferred to the plate. Since the cake has a soft texture, it doesn't set quickly. So you have time to level it perfectly. But you need to transfer the mix to the plate immediately from the kadai else the last portion left in the kadai tend to set faster leaving some granule texture to that part of the cake.


Ukkarai

This is a tradional sweet, made for Diwali in most of the Kerala Iyer homes, though i don't make it for every Diwali. This time around, I wanted to make it for memory sake.

1/2 cup tuvar dal

1/2 C chana dal or use 1 cup of chana dal alone

1 cup jaggery

3 tblspn ghee

Elaichi powder

Roasted cashew - few

Grated coconut - 3 tblspn


Roast both the dals till light brown. Pressure cook till it is soft and not mushy. Drain the excess water. Pulse the cooked dal along with coconut to a smooth paste.

Heat jaggery in 1/4 cup of water. Make syrup till it reaches the soft ball consistency. A drop of the syrup dropped in a tablespoon of water,should be able to roll into a soft ball. Stir in the ground dal + coconut paste. Keep stirring till the jaggery syrup is full absorbed by the dal and it turns dry. Add ghee at intervals. Mix in roasted cashew and cardamom powder. The texture is soft but not sticky.


Kaja ~ Andhra Special

I had the recipe noted in my diary, long back, taken from a Tamil magazine. In the magazine, the recipe was named as Curly Biscuits. The recipe was new to me and seeing the name I thought it as an innovative recipe. I had tried it then.  Later, blogging introduced me various regional specialities and I found the sweet is Kaja, a speciality of Andhra. I understand there are varieties of Kaja, marked by regional variations. I found a similar recipe at Srivalli's. Valli has neatly explained with step-by-step pics.


Preparing dough - 15 minutes
Resting time - 1 hour
Making kajas, deep frying, and clicking photos - 1 hour

Ingredients

Maida/All purpose flour - 2 cups

Salt - a pinch

Baking soda - 1 big pinch

Ghee - 2 tspn + 2 tblspn

Rice flour - 3 tblspn

Water - 3/4 cup


Oil to deep fry


Syrup

Sugar -1 cup heaped

Water - 3/4 cup


Mix maida, salt, baking soda and ghee. Add water to make a pliable dough. Leave the dough for an hour.  Resting time for the dough is essential to get good results. In a bowl mix together rice flour and ghee.It should be of spreadable consistency.


Pinch of a ping pong sized dough. Roll into a chappathi. Spread the rice flour + ghee paste on it.


Place another chapathi on it. Fold it from one end.


Lightly press the edges so that it sticks and doesn't open up. Cut intp 1 inch long pieces.


Slightly press them down to flatten the pieces.


Deep fry the pieces in moderate heat. Don't heat the oil to smoking point and fry in high flame. The inside layers will not get cooked.

Mean while prepare sugar syrup for one string consistency. Dip the fried kajas in the sugar pieces. Leave it for 2 minutes. Then remove them and spread it on a plate to cool.


October 16, 2009

Ribbon Pakoda & Mathri ~ Savories for Diwali

Diwali is one festival when we can have our choice of  savories and sweets to be made. Unlike most of the festivals which has a predefined menu  like Murukku, Seedai for Krishnajayanthi, Kali for Thiruvathirai, Appam,Pori for Karthigai etc. When it comes to Diwali recipes, DIET comes last for me. The amount of oil, sugar and ghee doesn't affect the choice of sweets or savories. Celebration is the key word and Diwali comes only once in a year. So lets get onto the savories I made for this Diwali. Come what may, Ribbon Pakoda is always there. I made no exception to that rule this year too. There is no fixed recipe for pakoda. I feel each family has a recipe of their own, passed down from generations. Here is mine.


Ingredients

Rice flour - 3 cups

Gram flour/Besan - 1 cup

Butter - 3 tblspn

Salt - 1/2 tspn

Chilli powder - 1 tspn heaped

Hing

Water to make the dough

Oil to deep fry


Method

Measure rice flour and besan in a vessel. Add butter and chilli powder. Mix well so that the flour is well coated with butter. Mix in the salt and hing dissolved in water. Add enough water to make a pliable dough. Heat oil in a kadai. Using the pakoda achu/plate, press it into hot oil. Gently flip with a perforated ladle and remove when it is golden brown. Drain and leave it to come to room temperature. Store in air tight container.

My MIL adds a 1/4 cup of roasted and powder tuvar dal. It sure adds to the flavor. But I was lazy to do that. So I skipped it. Nevertheless, mine turned out to be very crispy and melt-in-the-mouth kind.

Note: If store bought rice flour is used, you can measure rice flour :besan in the ratio 2:1 to get crispier pakodas.


Mathri/Mathi

The other savory is from the Land of Rajasthan - Mathri/Mathi. The is the first time I am trying at home though I have tasted it. On goggling, I went through several recipes and found that more than the measurement of ingredients, it’s the way of making them that is important to get flaky, crisp biscuits. And I followed the instructions at Tongue Ticklers. Harini has given all the little points to be taken care of. Though she has baked it, I deep fried them. My ingredient list slightly varies from hers, but I followed her method to prepare the dough. It came out excellent. Do drop into her space to have a look at the perfectly baked mathris. I am sure going to bake them soon.


Ingredients

Wheat flour/Atta - 2 cups

All purpose flour/Maida - 1 cup

Salt - 1 tspn

Chilli powder -1/2 tspn

Pepper powder - 1/2 tspn

Kasuri methi - 2 tblspn

Ajwain/Omam- 1tspn

Turmeric - a pinch

Hot oil - 3/4 cup

Warm water - 1 cup


Oil to deep fry


Method


Take wheat flour, maida, salt, chilli powder ,pepper powder, ajwain and turmeric in a bowl. Mix the ingredients well. Make a well in the centre. Pour the hot oil. rub the oil into the ingredients using a spatula. The more the oil and less water used in making the dough, gives better biscuits. I felt the amount of oil used was right enough. So used water to prepare the dough. Add kasuri methi to the dough. Don't knead the dough. Just bring together as you do for cookies.

Take marble sized dough and press it down between your palms. Else you can roll it using the rolling pin. I rolled into a big thick chappathi. Cut into small circles with a bottle cap. Make marks on top with a fork or knife so that it doesn't puff up while fried. Deep fry 4 or 5 mathris in a batch till it is golden brown. When cool it is very crisp and flaky. Since I have added chilli and pepper powders, it was spicy too.


My diwali sweets will follow in the next post.


Wishing you all a very happy and safe Diwali/Deepavali.


October 14, 2009

No bake chocolate pinwheel

Everyone must be busy planning for the festival weekend. And most of you must have already started with the preparations of sweets and savories. Here is a quick, no cook, recipe to delight your kids. I made this when my niece was here for her summer holidays. As always, I clicked few pictures and forgot about it. When Srivalli announced the Kid's Delight event, I wanted to send this. I got the recipe from a TV show, where in they were showing some quick recipes which can be made by kids themselves.


You need

Marie biscuit - 1 pkt

Cocoa Powder - 2tblspn

Powdered sugar - 5 tblspn

Butter - 2 tblspn

Milk - 4 tblspn


Method


Powder the marie biscuits in the mixer grinder. Seive it to get fine powder. Else it will make rolling the dough difficult.  Mix in cocoa powder and 2 tblspn of sugar. Prepare a tight dough using milk. 


You can mix some coffe powder in the milk if you love the flavor of coffee in your cookies. Coffee and chocolate complement each other well.

For the filling

Beat butter and sugar until creamy. You can optinaly add some dessicated coconut or coarsely chopped nuts also.


Roll dough into a thick chappathi. Spread the filling evenly. Leave some space at the edges. Then roll from the longer end to form a log shape. Roll it tightly and seal the crack if any, as you roll. Cover the log in a butter paper or aluminium foil and refrigerate for 2 hours. Cut along the width to get beautiful pinwheel cookies.


It will be a great hit among the kid's if it is part of the birthday parties.


October 10, 2009

Whole Wheat Chocolate Chip Cookies

It’s close to two months since I baked something. Last two months we had lot of festivals. And finally after Navarathri, I wanted to bake something, before the preparations for Diwali begin. There were many bananas to be used up. So baked Dates Banana muffin during the last weekend. I didn’t use any all purpose flour or maida. The reason being it not available in my pantry. So used whole wheat flour/atta and 1/2 cup of arrowroot powder. It came out very well - moist and light. I expected a denser muffin. I think the arrowroot
powder contributed to the texture. This was my first bake where in APF is not used at all.  And I was really happy with the result. So I decided to try my luck with whole wheat cookies. On browsing for a suitable recipe, I found one at AllRecipes.  I tweaked it to suit my pantry and made it eggless too. Now I have a whole wheat cookie recipe. I think with this as base, you can work on it for different flavor and combinations of nuts etc.


Yields: 20 Nos.
Temp: 190 C
Time - 18 minutes


Ingredients


Butter - 1/2 Cup

White sugar - 1 cup

Vanilla essence - 1 tspn

Flax seeds powder - 2 tspn

Water - 1/4 cup

Whole wheat flour/Atta - 1 1/2 cups

Baking powder - 1/2 tspn

Salt- 1/2 tspn

Chocolate chips - 1/4 cup


Method

Cream butter and sugar until creamy and light. Add vanilla essence and flax seeds powder  mixed in water.
Sift together wheat flour, baking powder and salt. Gently combine the dry ingredients into the wet mixture. Mix until it’s just combined. Fold in the chocolate chip cookies. Don't knead. Just gather the dough together. Pinch off a lemon sized dough and shape it. I didn’t shape it much. Just flattened it little with a fork to get a rustic look.


Bake in a preheated oven at 190 c for 18 minutes or till you can find brown specs on top. Leave it on the cookie sheet for 10 minutes. Don't try to remove them immediately. It will be very soft and will harden on cooling. The cookies were crunchy. It is a treat to have with tea or a cup of milk.


I am taking these healthy cookies to the High Tea  hosted by Aparna as part of Meeta's Monthly Mingle


October 9, 2009

Kai Murukku ~Amma's Special

For so many years, murukku meant only the kaimurukku for me. We called murukku only  that. Later on, I realised its a more general way of referring murukku, muthuswarams or thenkuzhal...Okay, you got the drift. When I posted this month's ICC, I had mentioned about kai murukku. While on twitter, Aparna asked me about the recipe for the murukku and I promised her I shall post it soon. These pics have been lying in drafts for more than 4 months. Thanks to Aparna, that it finally came to the light of blogosphere. Before you all jump to the conclusion that I an expert on this, let me confess, I am merely documenting my Amma's recipe. It was she who did this when she was here. To be frank, I haven't made any serious attempts on this regard.

And my Amma is an expert and unfortunately me and my sister doesn't seem to inherit that genes.


Things to keep ready
Fresh rice flour is used for making murukku. I am not sure how best result you might get with store bought flour. Since I have seen only made with fresh flour. As with all Indian  avories, this recipe also requires you to soak the raw rice for 1 hour. Drain and shade dry. Then pound in the mixer grinder or near by flour mill. Seive the flour.

Split urad dal is to be roasted on low fire till it is pink. Cool and powder. Sieve to get fine powder. Ura dal flour can be prepared a day ahead or so.


Solid hing gives a better flavor than the powdered ones. If using solid hing,soak it in warm water for half an hour. If hing powder is used, then also dissolve it in the water.

The proportion of rice flour :urad dal powder is 7: 1. Measure using the same cup. Its not necessary that you use the standard measuring cup. Any size cup can be used provided you measure both the ingredients with the same cup. Quantity of the rest of the ingredients are indicative. So adjust according to the size of the measuring cup you use.

Now on to the recipe,

Ingredients

7 cups of fine raw rice flour

1 cup of roastedd and powdered urad dal

Butter - 3 tblspn

Jeera/Cumin -1 tblspn

Hing -

Salt

Water to make the dough

Oil to deep fry

Method

Measure rice flour and urad dal powder into a wide vessel. Add butter, jeera . Dissolve the salt in the hing water. Add the hing,salt water. Mix the ingredients well. Add water to make  pliable dough. When making in large quantities, its ideal to prepare the dough in batches.


Spread a cotton cloth. Take a lemon sized dough in your hand and start making murukku. I should have taken a video but I missed. I shall surely do that next time. You can apply some coconut oil on your hands. This will help to make the swirls with out breaking.


Leave it for 15 minutes to dry on the cloth, before you deep fry. Meanwhile heat oil in a  kadai. Slowly lift the murukku from the cloth using a flat spatula (Dosa thiruppi) and transfer to a plate. Slowly slide them into oil. When one side is fried, flip with a slotted spoon. When both sides are cooked, it will have a golder color. And also the sizzling of the oil around the murukku ceases.


Drain and when cool, store in airtight containers.


These are crunchy but not the melt in your mouth kind. If you add more butter, it will drink more oil also, thought it might not be very hard.


October 8, 2009

Golu pics from Mumbai

Our Aunt, Lalitha  at Mumbai, has sent in her golu pics along with snaps of  few prasadoms for my blog. She is a great cook  herself. She to enjoys cooking variety of recipes. Aunty is involved in a Bhajan group and is the active co-ordinator. If only she had some more time for herself, I am sure she would have started a food blog. She is very much interested in my blog and keeps telling that she will click and send few recipes for mine. Her busy schedule doesn't make it happen. And even Uncle and their son have promised me some recipes for my blog.  So enjoy the pictures for now.


Paal Payasam and Vadai for Saraswathy Poojai

Day ~9 Saraswathy Pooja


We keep the books on 8th day night for pooja. Though pooja for the books are done on 9th day morning. It is customary to make paal payasam and Vadai for nivedhyam. As kids, we used to look forward to this day, since this was the only day, when we are asked not to study. When our books are kept for pooja, we never used to read even newspaper or any thing on that regard.

Paal Payasam

Instead of doing the traditional way of making, I have opted the easier route, which results in equally good payasam. So why slog extra time in the kitchen. Let me tell you, this method works good for small quanitities. Let me give the recipe first


Ingredients

Broken raw matta/brown rice - 1/4 cup

Milk - 1 litre

Sugar -1 1/4 cup (Can reduce to 1 cup if you want don't want it to be too sweet)

Butter - A teaspoon (optional)


Wash the rice and add all the ingredients in a cooker. Make sure the ingredients come only to 1/4 of the cooker capacity. Later, on cooking, the milk will rise and it will start coming out of the steam vent. This is the reason I said the method suits only to small quanitities. I used my 5 litres cooker. Still during the last few minutes, milk came out through the vent on the top. After first whistle, set the flame to the lowest level. Let it cook for 20 minutes. Switch off the gas and leave it for another 30 minutes. Open the cooker to find creamy, pinkish pal payasam. Add a dab of butter if desired. I don't usually add cardamom powder since I like to retain the creamy milk flavor.

Isn't it easy to cook this way? And doesn't it look like the famous Ambalapuzha Palpayasam. As I have mentioned in my earlier post, husband doesn't eat this payasam. So its the only occassion that I make this payasam.

Vadai
I have posted the recipe earlier.


October 7, 2009

Navarathri Day 7 & 8 - Rice coconut Payasam, Cherupayar Sundal & Moong Dal Payasam and Kabuli Channa Sundal

Day 7

Rice Coconut Payasam


Ingredients
Rice - 3 tblspn

Coconut - 1/2 portion

Milk - 1 cup

Cardamom powder - 1 tspn

Ghee - 2 tspn

Cashewnuts - 10 nos


Wash and soak rice in enough water for half an hour. Grate the coconut. Grind the soaked rice and grated coconut together into a coarse paste. Take two cups of water in a wide vessel. Mix in the ground coarse paste to the water. Boil over low fire, enabling rice to get cooked well. Keep stirring to avoid lumps. Rice turns lumpy quickly on cooking. When rice is cooked well, add sugar. Stir well. When sugar is fully dissolved, add the milk. Bring to a boil and let it simmer for few minutes. Stir in the cardamom powder and roasted cashewnuts and remove from fire.


I followed the recipe from Meenakshi Ammal's. The recipe said 3/4 cups of rice. I used the said amount and the payasam turn into a pudding consistency. Then I adjusted by adding milk. So in the recipe I gave above, I have reduced the amount of rice.


Cherupayar/Whole moong Sundal - Sweet.

The procedure is same as the vella payar (black eyed beans) sundal. With whole moong, no soaking is required. I just dry roast and pressure cook. It cooks mushy and is perfect for the sundal.


Day 8

Moong Dal Payasam

Moong dal - 3/4 cup

Jaggery - 1 cup

Milk - 2 cups

Roasted cashewnuts - 10 nos

Elaichi powder - 1/2 tspn


Dry roast moong dal over low fire for few minutes. Pressure cook dal and it should be cooked well. Melt jaggery in 1/2 cup of water in a thick bottomed vessel. When the syrup starts bubbling, stir in the cooked and mashed dal. Let it simmer for few minutes so that the dal soaks in the jaggery flavor. Stir in boiled milk and boil for few minutes. Don't let it simmer since it might curdle. Usually, with jaggery, coconut milk is used. Add elaichi powder and garnish with roasted cashewnuts.


Kabuli Channa Sundal

The procedure is same as the kadala sundal given earlier


And with another one post, I will finish the Navarathri series.  I wanted to post these as and when it was made. But could not. After Navarathri, the days went in a flash and by the time I finish with these, its time for Diwali treats.


October 4, 2009

Navarathri Day 5 &6 - Kozhukkattai Payasam, Ammini Kozhukkattai & Poori Payasam, Puli Avil

Day 5

Kozhukkattai Payasam


I have heard of kozhakkattai payasam but never got an opportunity to taste. My MIL has tasted it a relative's house and she gave me an outline of the recipe. But didnot know the proprtions well. The recent addition to my cook book collection is Meenakshi Ammal's 'Cook & See' Part II which has a lovely collection of traditional sweets and payasams. Since I had decided to make 9 different payasams for Navarathri, I got an opportunity to try it out.  I tried with half the quantity mentioned in the book. That was  enough to serve 4.


Ingredients


Rice flour - 1 cup

salt - a pinch

Water - 1 cup

Ghee - 1 tspn

Jaggery - 1 cup

Milk - 1 cup

Coconut Milk - 1/2 cup

Cardamom powder -1/2 tspn


Method


Prepare the rice flour in the same way is made for different savouries - Soaking, shade drying and powdering. I get it pound in the flour mill. So that part is easy.


To make Kozhukkattais

Equal quantity of water to the measure flour is used. Here 1 cup of water is heated with a  teaspoon of ghee and a pinch of salt in a shallow vessel. When the water starts boiling, slowly stir in the flour without forming lumps. Turn well for 3-5 minutes. When the flour gets  cooked well (you will know by the change in colour of the dough), switch of the fire and cover  and leave it for 10 minutes. Spread the cooked dough on a plate to cool. Knead well with ghee. Make small balls to the  size of small gooseberries.


To preapre the payasam.

Measure the rolled balls/kozhukkattais. Using the same cup/vessel, measure equal quanitities of water. If you measure 2 cups of kozhukkattais, take 2 cups of water. Boil the water in a wide vessel. When the water starts boiling, add few balls, at a time. Once a batch is added, give time for the balls to cook and come up to the surface. I added in 3 batches (around 25 nos in each batch). Once all the balls are added, while boiling, gently turn the balls with a flat spoon. Don't do stir it often since it will break the balls. Also do not add all the balls at once, since the balls will dissolve in the water. If you keep in mind these aspects, you cannot go wrong. 

Once the kozhakkattais are well cooked, add the powdered jaggery. When the jaggery melts and blends well, add the milk. Cook for two minutes. Add the coconut milk. Just bring it to a boil. Let it not reach the rolling boil stage since it might curdle. Remove and add the elaichi powder. If desired, roasted cashewnuts can also be added.


To make a vegan version, you can use omit milk and use only coconut milk. I liked it very much. Though reading the recipe may give you the impression of a laborious process, it will not take more than 30 minutes to prepare the payasam. Only the kozhakkattai making part takes time. Rest is very easy.


Ammini Kozhukkattai


Since I pound the flour in large quantity, I decided to make ammini Kozhukkatai for evening prasadom. The kids who comes daily for prasadom loves this and have been asking me when I will be making it for prasadom. The kozhakkattais dough is prepared the same as I mentioned ealier. Since this are savory, my MIL grinds 2 chillies along with a tablespoon of rice flour to a fine paste. This chilly paste is added to the boiling water before the flour is tipped in. This will give a nice flavor and some heat to the kozhukkattais. The kozhakkattais are then steamed for 10 minutes. When cool, it is sauteed in a seasoning of mustard, red chillies and curry leaves.


Day 6 ~ Poori Payasam & Puli Avil


Poori Payasam

Recipe Source : Meenakshi Ammal's Cook & See (II)


Ingredients

Wheat flour - 3/4 cup

Milk - 2 cups

Sugar - 1 1/2 cups

Cardamom powder - 1/2 tspn

Saffron a pinch

Water - 1 1/2 cups

Oil to deep fry.


Method


Knead wheat flour with little water a 2 tspn of ghee. The dough is quite stiff. Roll out into thick pooris. Cut the poories into small diamond shaped peices. Deep fry the pieces till it is crisp and golden brown in color. While frying, something else took my attention away for few seconds, one batch was just brown.


Boil 1 1/2 cups of water in a wide vessel. Whe the water starts boiling, slowly drop the fried  pieces and let it cook for 5 minutes. Add the sugar. When the sugar melts, add the milk and bring to a boil. Let it simmer for few minutes. Add saffron and elaichi and remove from fire. I found the payasam to be very watery. So I mixed 2 teaspoons of arrowroot powder in cold milk and stirred into the payasam  and cooked till the payasam starts thickening. Also next time I will reduce the sugar to 1 cup since it was too sweet for our palette.  My MIL said she has tasted where the pieces are not cut this way. Instead the fried poories are later torn into pieces and added to payasam. I think that might give a better texture to the payasam too. The payasam tasted like the sugar dipped diamond bisuits added to milk.


Puli Avil

I have already blogged about puli avil using lemon juice. Instead of lemon juice for the tangy taste, tamarind extract is used. So the tamarind juice is added soon after the seasoning and its cooked till it thickens. Rest of the procedure is same. Here I have added peanuts too to give a crunch to the avil.